|
I had to cut the steel and some of the plastic ends to get the bones to stay in their casings, but it's mostly done now...little fiddly bits to finish up. Here are a couple of pix  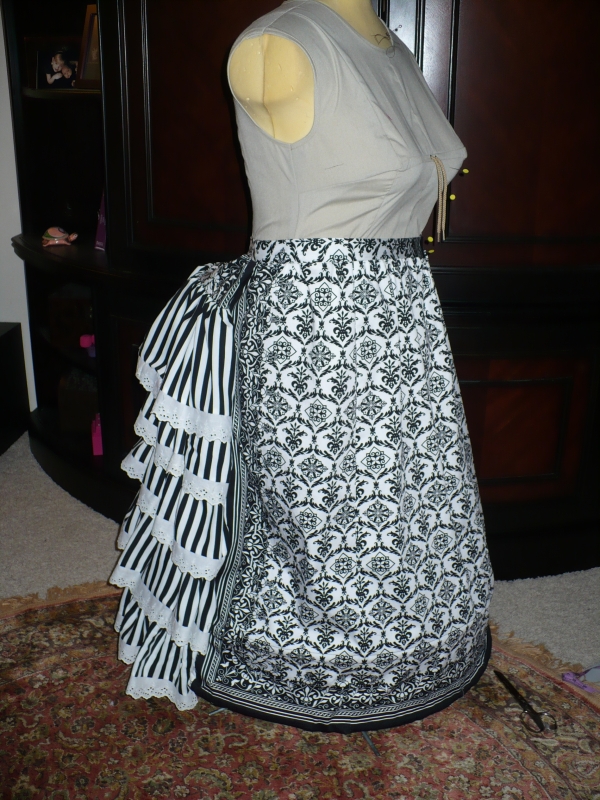
0 Comments
I was able to *almost* finish the bustle...like really, really finish. It needs a closure, and I'm not sure yet, but I probably will add that hem ruffle since with the boning in the whole thing poofs out, making it shorter!
I decided against taking the entire thing apart to fix a ruffle thanks to advice from a few friends. It is afterall underwear, and I won't be showing them off often, if at all. Because I ordered the plastic tips for my boning, the bones are too long. The tips have about a 3/4 inch tab on them so you can sew them into your garment (I'm guessing), so I'm going to try cutting off the plastic in some places and may need to shorten the bones too if they're still too long. That will be the end of this project, hopefully pictures tomorrow! Estimated work time: 5 hours In other news...corset! I made my first corset in 2006 before Costume College and the corset making class I took there. I don't think my first shot at corsetry was very bad at all...so I'm thinking it may be acceptable for me to use this corset instead of making a new one...BUT at the same time, I'd like to make a new one. I'm going to try the old one on tonight and check the fit though. I don't know what kind of supplies I'll need for a new corset so I'll have to evaluate the stash and decide. In thinking "too bad this corset is pretty nice, but I want something prettier"...I came up with a plan for my first corset (which is made of a tan & taupe stripe fabric). I could change the binding on it and possibly use it for Steampunk stuff! I'm pretty excited that it may still be usable! So, I suppose that means I have some corset making in my future. I'm thinking of buying bone casings so I don't have to deal with sewing channels. I wonder if I need more boning as well. Hmm... Ugh...and I'm afraid there will be at least a 5th edition as well!
I had time to take the extra eyelet I needed off the fabric it was attached to on Saturday, and last night I was able to work on the bustle more. I cut the hoopsteel in the lengths I needed, so they are ready and waiting. I also attached the top 4 ruffles and though its out of order for instructions, I'm starting to add the waistband so that I can adjust the hem if needed. I'd adjust from the top instead of the bottom (especially in the front) because of the border around the skirt. I have the waistband pinned on right now, but am thinking I may move some gathers around because as it is they are all on the side front, and I probably need some extra room in the front front. So, I need to attach the waistband, add the last two bone casings/hem, the closure, I think I have one more ruffle to cover the bustle part (but I think I'll skip the hem ruffle for now, I can always add it later), then just add the bones and try it out! Yip! Yes, the creativity in Subject Line entries is just oozing. Brad and I ran out for dinner last night and because we planned on stopping by the sewing store, we ate close by. I was surprised that we were out for less than an hour because usually when we go out it takes us alot longer 3 times longer than that! We went to A-1Sew Craft in Champlin, a little town about 3 miles from where we live. I was surpised to find the little store when we were house shopping and made a note stop in there. Last night I got my chance. I wanted a ruffler foot and though Hancock had them, I figured if I'd like to keep the little sewing store around I should give them a some of my business. I'm glad I did because the gentleman in the store was very helpful, showed me how to attach the foot to the machine, gave me some pointers and even showed me how to use it. I like Hancock, but I don't think they would have took the time, or had the knowledge to do the same. The foot is SO COOL! Wow! I'm was surprised to learn there was such a thing, and even better that it works...I'm not sure if this is the foot my friend Debbie used to make the pleats on her pretty Victorian, but so far, with little frustration in getting started, it workes well at making pretty ruffles! So, I played with the ruffler for a little bit, then started working. I figured I had so many lengths of fabric to cut for ruffles I should do that early in the evening, so I did. I cut 8 in total, sewed them together and zigged one side. The other side is going to have a bit of eyelet lace, so I left that edge raw until later. Later, because I am using an eyelet lace I bought a few years ago in a thrift shop. The lace was attached to long lengths of gingham, one was navy blue & the other poopie brown.  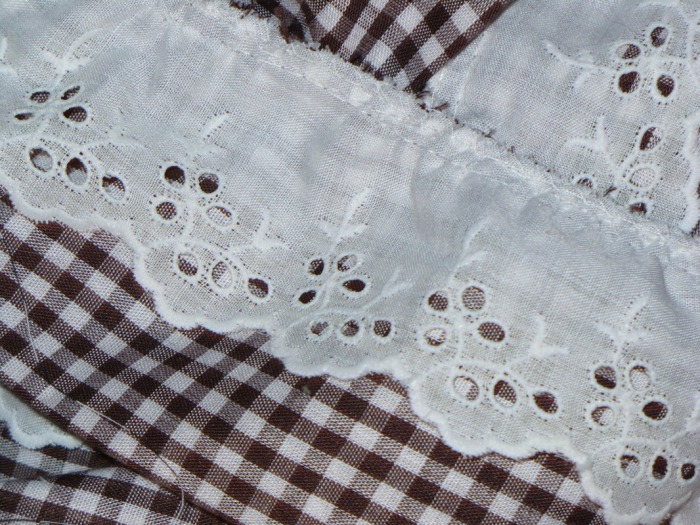 At some point I either wanted to use this trim on another project OR I had the foresight to start picking it off and did so when I had nothing else to do (I don't remember that period in my life :)) because I had a 6 yard length already cut away from the navy blue gingham. I'm going to need all of this stuff, so I'm going to have to make time to get the rest of this stuff off the fabric.
I'm giving myself points for this because I'm reusing something that could have been thrown away. It ended up saving me money because I'm sure this eyelet would have sold for at least $1.50/yard and I bet I paid $3.00 for the whole 13ish yard lot, though there is a little brainless work involved with seperating it from it's former life. I'm also giving myself points for the fact that everything in this bustle was in my stash! Yay for using the stash for what it was intended for! Yay for making space in my stash containers! Yah for working on projects! Back to the recap, I cut the back brace piece, marked stars on the bustle back and back brace, turned under the top and bottom raw edges of back brace and that's about it. estimated work time: 3 hours I got the chance to work on the bustle more on Tuesday night. I worked on it for 3 hours more or less. I cut the back piece out of a white sateen and then figured out where I should cut the patterned fabric for the back part that isn't under ruffles. This may sound confusing, but I will take pictures of what I mean. Then I put all the boning channels on.
I ordered buckram covered hoopsteel from Greenberg & Hammer on Monday, and I would be suprised if it wasn't waiting for me when I got home today! I'm excited to see how this 2D stuff is going to morph into 3D! I got all the homework I had due tomorrow and Saturday done today, though I didn't like score I received on my assignment and don't know why I got the answer wrong...so I had to email my teacher and now I'm waiting for him to reply. I wouldn't be surprised if I didn't hear back from him, but I will keep following up if I have to. Anyway, because I got my homework done, I should be able to work on the bustle tonight, though I think I have several more hours of work to do, and won't get it all done tonight. *wonders where I can buy a ruffle foot and if I might already have one* I have alot of ruffles to gather by hand if I don't use a foot...hmmm... appoximate work time: 3 hours (also listed above) I started cutting the fabric for the front of my TV Grand Bustle yesterday. The fabric is a sateen with a pattern and a border, so I tried to match the pattern where I could...but it was a challenge. If I had more experience matching patterns it may not have been as difficult...the fabric I used was one I had in the stash (I have been hellbent on using stash fabrics where I can so I can buy more stash fabrics) and I liked the pattern & the border, so I'm happy with my fabric choice, though it did take more time than a solid would have.
That took most of the night, fiddling with matching patterns, then realizing for the side front pieces it wasn't going to work out exactly right, so I accepted it and frenched seamed the two side front pieces. (There are 4 front pieces to this pattern). Since I don't have very much of the above mentioned fabric (only 2.25 yards) and since the pattern would be wasted even if I did because it would be covered with ruffles, I am using a different fabric on the back side (I will be piecing the top part of the back with the patterned fabric so it won't look different. I pressed the back fabric and thats when I quit for the night. So far this pattern looks very simple and I don't think it should take me very long to finish it up. That's only partially true because I'm adding lace to the ruffles and doing things that most people in a hurry wouldn't probably take time to do. Yet, if I want lace on my ruffles I gotta do it now because it will be too late once it's all put together. Also, I need to order hoopsteel and I hope I can remember to do that today. I also need the ends, maybe some connectors in case I need them in the future, and grommets. estimated work time (way longer than it would have taken if I hadn't futzed with matching patterns): approximately 4 hours |
 AboutThis blog is a temporary spot while I get my thoughts in order for a more permanent space. Categories
All
Archives
August 2012
|
 RSS Feed
